Choosing between bead blasting vs anodizing is not a style choice. It is a manufacturing decision that changes risk in fit, appearance, corrosion behavior, and rework options. The hard part is that the two processes do different things. Bead blasting mainly changes surface texture. Anodizing mainly changes the surface chemistry by growing an oxide layer.If you treat them as interchangeable “finishes,” you can end up with parts that look inconsistent from lot to lot, have unexpected size change, or fail cosmetic expectations after handling.
This article is written for engineers and technical buyers who need to judge feasibility and define the next question to ask a machine shop offering torneado de precisión CNC y CNC milling services, or a dedicated finishing vendor.
Bead blasting vs anodizing: fastest way to choose
A fast choice comes from being clear on the primary goal. If you want a controlled matte texture and to hide tool marks, bead blasting is the direct lever. If you need an oxide finish for protection, color, or electrical behavior, anodizing is the direct lever. Many aluminum surface finishes are used both because texture and oxide growth solve different problems.
Decision matrix table: goal (appearance, texture, protection, cost) vs process (bead blasting, anodizing)
| Goal / constraint | Bead blasting (media blasting) | Anodizing (electrochemical oxide) |
|---|---|---|
| Reduce visible tool marks on CNC machined surfaces | Often effective because it redistributes light with a matte/satin texture | May not hide tool marks by itself; tends to “lock in” whatever texture is present |
| Create a uniform matte or satin-like finish | Primary strength; media choice and pressure drive the look | Possible but depends heavily on pre-finish; anodize alone does not guarantee uniform reflectivity |
| Add a functional surface “coating” behavior | Not a coating; it changes topography more than chemistry | Primary strength; forms an oxide finish on aluminum |
| Color (black, dyed colors) | Not a coloring method by itself | Common reason to anodize; color consistency depends on many variables |
| Tight fits and critical dimensions | Risk: blasting can round sharp edges and change local features | Risk: anodizing adds an oxide layer and can affect fits, threads, and bores |
| Rework flexibility | Often re-blastable if geometry allows | Stripping and re-anodizing is possible in some cases but adds risk to dimensions and appearance |
| Cost sensitivity | Can be simpler if used as a one-step cosmetic texture | Adds process steps and controls; cost depends on masking, racking, and cosmetic requirements |
| Schedule sensitivity | Often fast when done in-house or at a local vendor | Often batch-driven; queue time and handling steps can dominate |
The key point is that blasting is usually chosen to control what you see and feel, while anodizing is chosen to control how the surface behaves in service.
Checklist: questions to ask before choosing (material, end-use, tolerance, desired look, budget, timeline)
Before you pick bead blast finishes, anodize, or a combined route, you need enough inputs to avoid surprises:
- Material and alloy: Is it aluminum, and which alloy family? Mixed alloys in an assembly can look different after the same finish.
- End-use handling: Will the part be handled often, rubbed, or cleaned with solvents? Handling can turn some matte finishes glossy in contact zones.
- Critical dimensions and interfaces: Are there press fits, sliding fits, threaded holes, sealing faces, electrical grounds, or bearing bores?
- Desired look: Do you want matte, satin, or a more reflective look? Do you need “uniformity across faces,” or is variation acceptable?
- Masking needs: Are there areas that must stay unblasted or unanodized (threads, electrical contacts, weld zones, sealing faces)?
- Budget and timeline constraints: Is this a prototype where speed matters, or production where repeatability matters?
- Inspection plan: How will you verify the surface finish requirement—visual standard, roughness measurement, or both?
These questions matter because both processes can change edges, corners, and “feel,” even when the drawing looks simple.
When to use both together: sequencing options (prep → finish) (diagram)
Using both is common on CNC parts when you want a controlled matte texture and an oxide finish on top. The order matters.
| Option | Process Flow | Notas |
|---|---|---|
| Option A: Blast → Anodize (Common) | CNC Machine → Bead blast texture → Clean/activate → Anodize → Seal (if used) → Inspect | Standard process for a uniform matte anodized finish |
| Option B: Machine → Anodize Only | CNC Machine → Clean/activate → Anodize → Inspect | Retains as-machined texture; no additional surface texturing |
| Option C: Blast Only | CNC Machine → Bead blast texture → Inspect | Cosmetic/texture-only finish; no oxide coating or protection |
| Option D: Anodize → Blast (Uncommon) | CNC Machine → Anodize → Blast to remove/texture → Inspect | Typically for rework only; often negates functional anodize benefits |
If the question is “Should I bead blast before anodizing?” the practical answer is: bead blasting is often used as anodizing prep with blasting when you need a uniform matte texture and you can accept the texture being “captured” by the anodize layer. But it is not always safe for tight fits or sharp cosmetic edges.
Is bead blasting the same as anodizing?
No. Bead blasting is a mechanical impact process that changes surface texture by striking the surface with blasting media using compressed air (or another propulsion method). Anodizing is an electrochemical process that grows an aluminum oxide layer on the part surface. One changes mostly topography; the other changes surface chemistry and structure.
What each process does (and what it doesn’t)
A lot of confusion comes from calling both “finishing.” In practice, they solve different problems and fail in different ways.
Bead blasting basics: media blasting as a surface preparation / texture method (process diagram)
Bead blasting is a form of abrasive blasting. The usual intent is not material removal in the machining sense. It is to create a controlled texture and a more uniform appearance. It can also help with light deburring, but it is not a reliable way to remove burrs that affect assembly.
A simple process view looks like this:
| Paso | Descripción del proceso |
|---|---|
| 1 | Load part |
| 2 | Mask critical areas (if needed) |
| 3 | Select blasting media (glass bead, plastic media, aluminum oxide, others) |
| 4 | Set pressure / nozzle distance / angle |
| 5 | Blast to target look/texture |
| 6 | Clean to remove embedded media and dust |
| 7 | Inspect appearance + critical features |
Even though people say “blast finish,” bead blasting work is best treated as a surface preparation or texture step. It does not create a coating. It can also change the surface in ways that matter later, such as altering how a part reflects light or how it takes anodize dye.
Common misunderstandings:
- “Bead blasting is gentle, so it can’t change geometry.” It can change edges and small features, especially at corners and thin fins.
- “Bead blasting removes tool marks.” It can make them less visible, but deep tool marks can telegraph through a matte finish.
- “Any blasting media is fine.” Media selection changes both look and risk. Fine glass beads behave differently than sharp abrasive media.
Anodizing basics: an electrochemical surface finishing method (process diagram)
Anodizing converts the aluminum surface into an aluminum oxide layer using an electrolytic bath, with the part acting as the anode. This is not paint and not plating. It is a conversion of the surface into oxide.
A simplified view:
| Paso | Descripción del proceso |
|---|---|
| 1 | Load part onto rack/fixture |
| 2 | Limpiar / desengrasar |
| 3 | Etch or deoxidize (process-dependent) |
| 4 | Anodize in electrolyte under controlled conditions |
| 5 | Optional dye step (for color anodize) |
| 6 | Seal (process-dependent) |
| 7 | Aclarar / secar |
| 8 | Inspect appearance + thickness/coverage checks (as specified) |
Anodizing is chosen for many reasons: appearance, surface protection, and as a base for dyes. It can also be specified in different “types” and classes in common standards.
A frequent buyer question is: “Difference between Type II and Type III anodize?” In common specifications, Type II is a conventional anodic coating often used where appearance and general protection matter, while Type III is a “hard anodize” (hardcoat) used when wear performance is a larger driver. Both still depend on alloy, surface preparation, and process controls. If you need Type III, you should assume tighter control and higher sensitivity to geometry, masking, and inspection definition.
Key output differences: texture change vs coating/finish change (comparison table)
| Output characteristic | Bead blasting | Anodizado |
|---|---|---|
| What changes most | Surface topography (roughness/texture), reflectivity | Surface chemistry and structure (oxide layer) |
| Where problems show up | Uneven matte, shadowing, edge rounding, media contamination | Color mismatch, burning/defects, poor coverage on complex shapes, fit changes |
| What it “locks in” | It creates the final texture if no other finish follows | It preserves much of the pre-anodize texture; it does not erase machining history |
| Typical role in a route | Cosmetic texture, prep before another finish | Final finish for aluminum; sometimes after blast or polishing |
This is why “bead blasting vs anodizing” is often the wrong framing. Many parts need a blast step to get the look, then an anodize step for the surface finish behavior.
Does bead blasting remove anodizing?
It can. Abrasive blasting can remove or damage an anodized layer, depending on media type, blast settings, and how aggressive the blast is. If you blast an anodized part to change the look, you should assume you may reduce or eliminate the functional value of the anodize on blasted surfaces, and you may create a patchy appearance. For rework, this needs a planned strip-and-refinish approach, not an ad hoc blast.
Appearance & surface texture outcomes
Cosmetics are often the real driver for aluminum CNC parts, even for industrial products. The challenge is that “matte” and “satin” are not specs by themselves.
Surface finish language: matte, satin, uniformity, reflectivity (photo examples guidance)
Words like matte, satin, and glossy describe how the surface reflects light. Two parts can have the same average roughness and still look different because the texture pattern and directionality differ.
When you review samples or photos for matte vs glossy finish CNC requirements, make sure the comparison is controlled:
- Use the same lighting angle and intensity.
- Compare flat faces and edges separately.
- Include a “known standard” coupon when possible.
- Look for directional patterns that come from machining (tool paths) versus non-directional patterns from blasting.
A matte bead blasted surface often looks more uniform because it breaks up reflections. But uniformity can fail in pockets, near edges, or where the nozzle angle can not stay consistent. On anodize, visual uniformity can fail when alloy, surface prep, and bath conditions vary across a part or across batches.
Surface roughness/texture targets: how to specify and verify finish requirements (inspection checklist)
If appearance matters, you need a way to confirm it. Visual checks alone are subjective, but metrology alone can cause cosmetic defects.
Use a two-part approach:
- Define a visual standard: a reference part, coupon, or controlled photo set that shows acceptable variation.
- Define a measurable texture requirement when needed: specify a roughness parameter and measurement method, but only if it connects to function (grip, sealing, glare control, or matching adjacent parts).
Inspection checklist for bead blast and anodize appearance:
- Confirm the drawing calls out the finish scope (all over vs selected faces).
- Confirm masking boundaries and edge breaking expectations.
- Check for embedded blasting media or residue in holes and pockets.
- Check for inconsistent sheen across faces (especially large flats).
- Check corners for unintended rounding that changes the perceived “crispness.”
- If roughness is specified, confirm instrument type, cutoff settings, and sampling locations are agreed before production.
- For anodizing color, check under consistent light and against an agreed standard.
For engineers, the main risk is specifying “uniform matte finish” without defining how it will be judged. That becomes a dispute instead of a requirement.
Color and visual consistency considerations (especially for anodize finishes) (table of variables to control)
Color anodize adds more variables than many teams expect. Even when the same part number is repeated, the look can drift if the inputs drift. If color matters, ask your finisher what they control and what they cannot control.
| Variable that affects anodize appearance | Why it matters to what you see |
|---|---|
| Aleación y temple | Different alloys can anodize to different shades and levels of brightness |
| Surface prep route (as-machined, bead blasted, polished) | The pre-texture changes reflectivity and dye uptake behavior |
| Cleaning and deoxidizing steps | Inconsistent prep can lead to blotchy appearance |
| Racking/fixturing contact points | Contact marks can be visible, and current distribution affects uniformity |
| Geometry (deep pockets, sharp corners, thin walls) | Current density varies across the part, which can change appearance |
| Batch-to-batch process stability | Small shifts can be visible on cosmetic parts |
This is where bead blasting vs anodizing becomes a sequencing decision: blasting can help create a more uniform base texture, but it can also introduce variation if coverage is uneven. Anodizing can give a consistent “finish family,” but it will not erase differences created earlier.
Which is better for aluminum parts—bead blasting or anodizing?
Neither is “better” without a goal. If the main requirement is a matte or satin texture that hides tool marks, bead blasting is the direct method. If the main requirement is an aluminum oxide finish (with optional color), anodizing is the direct method. For many aluminum CNC parts, the practical answer is bead blast for appearance control, then anodize for the final surface finish—if the geometry and tolerances can accept both.
Performance trade-offs that drive the decision
Performance is where misunderstandings get expensive. A finish choice that looks good on day one can create handling marks, wear-through, or cleaning problems later.
Wear and handling expectations: how finish choice relates to real-world use (scenario examples)
Consider a few common scenarios:
A handheld enclosure: A bead blasted matte finish can hide fingerprints and small scratches at first. Over time, repeated handling can “polish” high-contact zones, creating glossy patches that look uneven. If you anodize over a blasted texture, you still can get handling gloss changes, but the oxide finish changes how the surface interacts with wear and cleaning. Your key decision becomes what kind of visual change is acceptable over the product life.
A fixture plate or tooling component: Blasting can reduce glare and make the surface look uniform, but it can also change how dirt and oils cling because the surface is more textured. If the part is cleaned often, a rougher texture can hold residue. Anodize may be chosen for surface behavior, but the specification should match use: do you need general anodize, or do you need a harder anodize type for wear areas?
A sliding interface: If a part has mating features or slides against another surface, blasting those surfaces can be risky because it changes texture and can increase friction or wear variability. Anodizing also changes surface behavior and can affect fit. In these cases, leaving functional faces as-machined (or controlled by another finishing method) while finishing non-functional faces is often safer.
Fit, tolerance, and dimensional concerns: when surface changes matter (decision notes)
Two buyer questions show up repeatedly: “Does bead blasting change part dimensions?” and “Will anodizing affect fit?”
Bead blasting can change functional geometry in localized ways, even if the average material removal is small. The most common effects are:
- Edge rounding: sharp edges become less sharp. That can break a cosmetic design intent or change how parts align.
- Small feature softening: thin ribs, small embossed marks, knurls, and fine grooves can lose definition.
- Hole and thread risk: blasting into threaded holes can change the feel of assembly and can trap media.
Anodizing can also affect fit because it grows an oxide layer on the surface. Even if your drawing tolerances look generous, the risk is highest in:
- Close-fitting bores and pins
- Threads (internal and external)
- Precision sealing surfaces
- Press fits and bearing seats
- Electrical grounding points where bare metal contact is required
A good feasibility step is to mark up the drawing into zones:
- “Cosmetic OK to change” surfaces
- “Functional texture OK but size sensitive” surfaces
- “Do not alter” interfaces (mask or post-process)
If you do not do this zoning, the finisher must guess. Guessing is where prototypes pass and production fails.
Maintenance and lifecycle considerations: cleaning, reworkability, and refinishing paths (flowchart)
Lifecycle planning matters when parts will be reworked, cleaned aggressively, or refurbished.
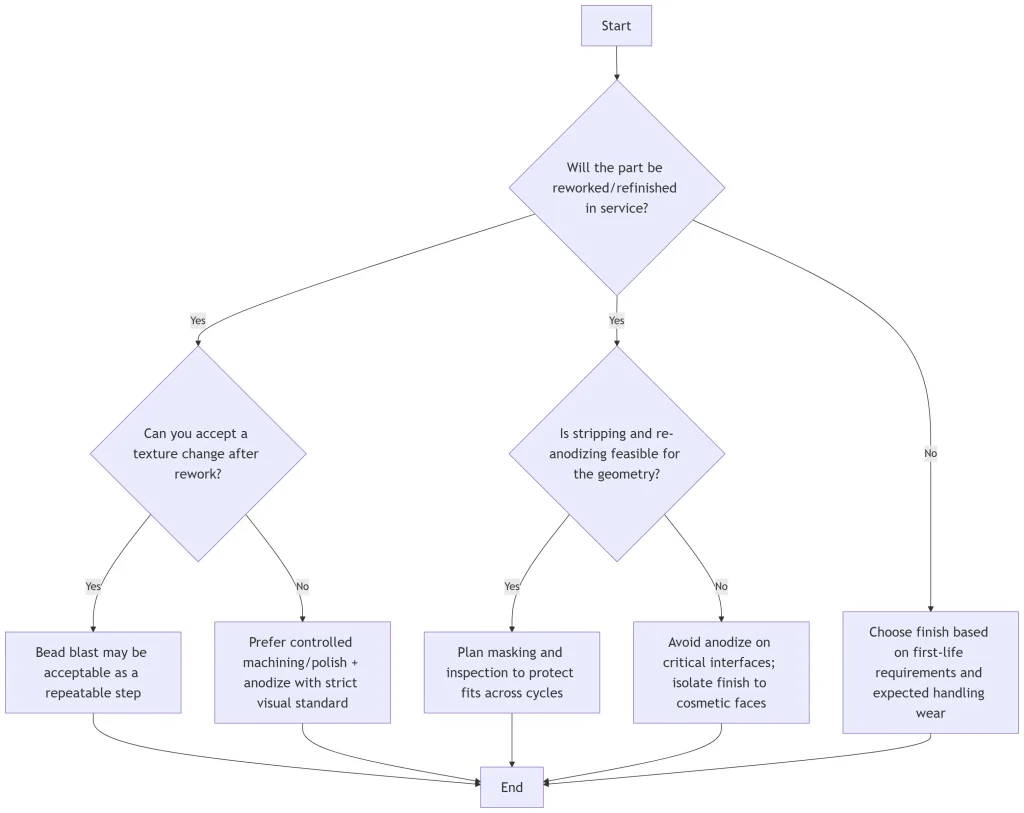
Cleaning is a practical issue, not a cosmetic one. A slightly roughened surface can retain dirt and oils. Some cleaning methods can also change the appearance of matte surfaces over time. If the part must stay visually consistent, specify acceptable wear patterns and cleaning constraints as part of the requirement, not as an assumption.
When “looks vs durability” is the real trade-off (pros/cons table)
| Trade-off | Bead blasting | Anodizado |
|---|---|---|
| Best at controlling initial matte texture | Sí | Depends on pre-finish |
| Best at adding an aluminum oxide surface finish | No | Sí |
| Risk of visible handling changes over time | Can develop glossy wear zones | Can still change, but behavior depends on anodize type and use |
| Risk to tight fits | Edge rounding and feature softening | Oxide growth can affect fits; masking often needed |
| Ease of spot repair | Re-blast may blend, but can be hard to match exactly | Spot repair is difficult; refinish often requires stripping and reprocessing |
This is why “best finish for aluminum CNC” depends on what failure you fear more: cosmetic drift or functional drift. The right answer is often a split approach: protect and control functional interfaces, then finish cosmetic areas for appearance.
Process workflow & prep requirements (how they interact)
The interaction between blasting and anodizing is where most “it didn’t come out like the sample” problems start. The part that anodizes beautifully as-machined may look cloudy when blasted, and the part that looks great blasted may show racking marks after anodize.
Typical workflow options: bead blast only, anodize only, bead blast + anodize (workflow diagram)
| Workflow | Process Flow |
|---|---|
| Workflow 1: Bead blast only | Machine → Deburr → Mask if needed → Bead blast → Clean → Inspect |
| Workflow 2: Anodize only | Machine → Deburr → Mask if needed → Clean/activate → Anodize → Inspect |
| Workflow 3: Bead blast + anodize | Machine → Deburr → Mask → Bead blast → Clean → Mask update if required → Anodize → Inspect |
The combined route adds interfaces between steps. Every interface is a chance to lose consistency: fingerprints before anodize, trapped media, or masking lines that show on cosmetic faces.
Can you anodize after bead blasting?
Yes, it is common to anodize after bead blasting, and it is often done to get a matte anodized look. The main feasibility checks are geometry (can you blast and clean all surfaces), masking (protect threads and fits), and cosmetic expectations (uniformity across faces and batches). Treat it as a defined process route, not an informal prep step.
Bead blasting vs sandblasting for anodizing prep?
Both are abrasive blasting, but they behave differently because media shape and hardness differ. “Sandblast” is often used to mean aggressive blasting with sharper media, which can create a rougher texture and higher risk of visible defects or dimensional impact. Glass bead blasting is often used when a more uniform satin-like finish is needed with lower risk of gouging. If the part will be anodized, pick the blasting media based on the target texture and the risk tolerance for changing edges and fine features, not based on the generic word “sandblast.”
Quality control checkpoints: before/after inspection steps
A workable QC plan for bead blasting vs anodizing is mostly about preventing the “silent failures” that show up late.
Before blasting:
- Confirm burr removal method and acceptance. Blasting should not be the primary deburring plan for functional edges.
- Confirm masking coverage for threads, bores, and sealing faces.
- Confirm the target look with a reference standard.
After blasting, before anodize:
- Verify media is removed from holes, pockets, and internal channels.
- Inspect for uneven coverage, shadowing, and edge rounding on critical features.
- Confirm parts are handled and stored in a way that avoids contamination before anodize.
After anodize:
- Inspect for color match (if dyed) against the agreed standard and lighting condition.
- Inspect for racking marks and contact points and confirm they are within the allowed zones.
- Verify that masked features function as intended (thread gaging, fit checks, electrical contact checks if applicable).
In short, the inspection plan should match the failure modes of the chosen route, not just the final appearance.
Cost, lead time, and production scalability
Cost and lead time are hard to generalize without introducing numbers. What you can do is identify the main cost drivers and decide which ones apply to your part.
Cost drivers breakdown: setup, masking, batch size, complexity (cost factors table)
| Factor de coste | Why it changes cost for bead blasting | Why it changes cost for anodizing |
|---|---|---|
| Masking | Adds labor and risk of cosmetic mask lines | Adds labor; poor masking can cause scrap due to fit issues |
| Part complexity | Deep pockets and tight corners raise time and inconsistency risk | Complex geometry complicates racking and coverage uniformity |
| Cosmetic level required | Higher cosmetic bar requires more control and inspection | Color matching and defect limits raise handling and inspection needs |
| Tamaño del lote | Small lots may be dominated by setup and handling | Small lots may be dominated by setup, racking, and bath scheduling |
| Mixed materials or mixed alloys | Can cause inconsistent look across parts | Can cause visible variation, especially in color anodize |
| Rework/scrap sensitivity | Re-blasting may be possible but not always matchable | Stripping and re-anodizing adds steps and can affect dimensions |
For technical buyers, the safest way to manage cost is to reduce ambiguity: define which faces are cosmetic, which must be protected, and what “good” looks like.
Lead time considerations: in-house vs vendor processing and queue time (timeline graphic)
Lead time is usually driven by batching, queue time, and inspection requirements rather than the blast time itself.
| Tipo de proceso | Typical Process Flow |
|---|---|
| In-house blast | Machine → Deburr → Blast slot in schedule → Inspect → Next operation |
| Vendor anodize | Machine → Deburr → Ship/transfer → Queue → Rack + process → Inspect → Return |
If you are schedule-limited, your main lever is reducing special handling: minimize masking, simplify cosmetic requirements where possible, and avoid mixing very different part families in a single cosmetic requirement.
Prototype vs production runs: choosing the most practical path (decision tree)

A common prototype failure is treating finish as cosmetic only, then discovering in production that masking and fit checks are the dominant constraints.
Simple interactive tool: “finish selector” calculator inputs (part size, quantity, cosmetic level, turnaround)
You can screen feasibility by asking for a short set of inputs and forcing a consistent decision. This is not a pricing calculator. It is a “risk filter.”
Inputs
- Material and alloy (single alloy vs mixed)
- Part envelope size and weight class (small/medium/large, by your internal definition)
- Quantity (prototype vs low volume vs production)
- Cosmetic level (utility, standard cosmetic, high cosmetic with tight visual match)
- Critical interfaces present? (yes/no; list threads/bores/sealing/electrical contact)
- Geometry complexity (open faces vs deep pockets vs internal channels)
- Finish route preference (blast only, anodize only, blast + anodize)
- Turnaround constraint (normal vs expedited, by your internal definition)
Outputs (decision prompts)
- “Finish route is feasible with normal controls”
- “Feasible but requires zoning + masking plan”
- “High risk for cosmetic uniformity; require sample approval and a defined inspection method”
- “High risk for fit; require interface masking and post-finish functional checks”
This kind of tool helps you make an informed decision early, before the drawing is locked.
Environmental, health, and compliance considerations
Both processes come with real safety and compliance duties. These are not paperwork issues. They affect process control and vendor choice.
Shop safety considerations: dust, PPE, and process controls (safety checklist)
Abrasive blasting creates airborne dust and rebound hazards. Anodizing uses chemicals and electrical equipment, plus mist and rinse water handling. If you are auditing a supplier or setting internal requirements, focus on whether controls exist and are used.
Safety checklist (high-level):
- Blasting area separation and dust control (containment and ventilation)
- Respiratory protection program where required
- Eye and skin protection for blasting rebound and chemical splash
- Media handling and housekeeping to prevent slip and dust hazards
- Chemical handling controls for anodizing lines (labeling, storage, spill response)
- Training and documented procedures for operators
The key point is that “blast” and “anodize” are both controlled processes. If a supplier treats them as informal steps, you should expect variability.
Waste and disposal factors: media, rinse water, and byproducts (comparison table)
| Tema | Bead blasting | Anodizado |
|---|---|---|
| Primary waste stream | Spent blasting media, dust, and removed surface material | Process bath management and rinse water streams |
| Risk focus | Particulate control and media contamination | Chemical management, wastewater handling, sludge/byproducts management |
| Compliance signals to look for | Dust collection maintenance, waste characterization approach | Documented wastewater controls, bath maintenance records, waste disposal documentation |
You do not need to be an environmental expert to ask for the right documents and to see if a shop is operating in a controlled way.
Vendor questions for compliance: documentation to request (checklist)
Ask for documents that show the vendor can run the process consistently and legally:
- Safety program summary relevant to blasting and chemical handling
- Waste handling and disposal approach (what streams exist and who manages them)
- Basic process control documentation (inspection steps, acceptance checks)
- Material traceability approach if alloy consistency matters for anodizing appearance
- Any relevant certifications or compliance statements required by your industry (if applicable)
These requests are also a proxy for maturity. A shop that can answer clearly usually has better repeatability.
“Greener choice” decision points without assumptions (decision framework)
“Greener” is not a single answer because it depends on your boundary: waste type, energy, water, and rework rate.
A practical decision framework:
- If your primary driver is reducing rework and scrap, pick the route with the best chance of meeting the requirement on the first pass. Scrap is often the biggest footprint.
- If your driver reduces particulate exposure, avoid aggressive open blasting and require controlled blasting systems and dust collection.
- If your driver is reducing water and chemical management burden, recognize anodizing requires more chemical control infrastructure than blasting.
- If your driver is reducing transportation, consider whether finishing can be done near the machining step without adding extra shipments.
This keeps the decision grounded in what you can verify instead of assumptions.
Application-based recommendations (use cases & examples)
Use cases are where the theory turns into drawing notes and purchasing decisions. The goal here is not to tell you one finish is always correct, but to show what to confirm before committing.
CNC machined parts: choosing a finish for typical expectations (use-case prompts)
For CNC machined aluminum parts, common expectations include reduced tool marks, consistent sheen, and stable fits.
Use-case prompts that lead to good decisions:
- If the part is mostly cosmetic and handled often, do you accept that a matte finish may develop shiny contact points?
- If the part mates to another part, which faces must keep the machined size and which faces can accept texture change?
- If the part has engraved marks, small text, or logos, do you need them to stay crisp after blast and anodize?
- If the part includes thin fins or sharp corners, is edge rounding acceptable?
These prompts make “bead blasting vs anodizing” a structured decision rather than a preference.
Consumer-facing cosmetics vs industrial utility: prioritizing the spec (two-path decision tree)
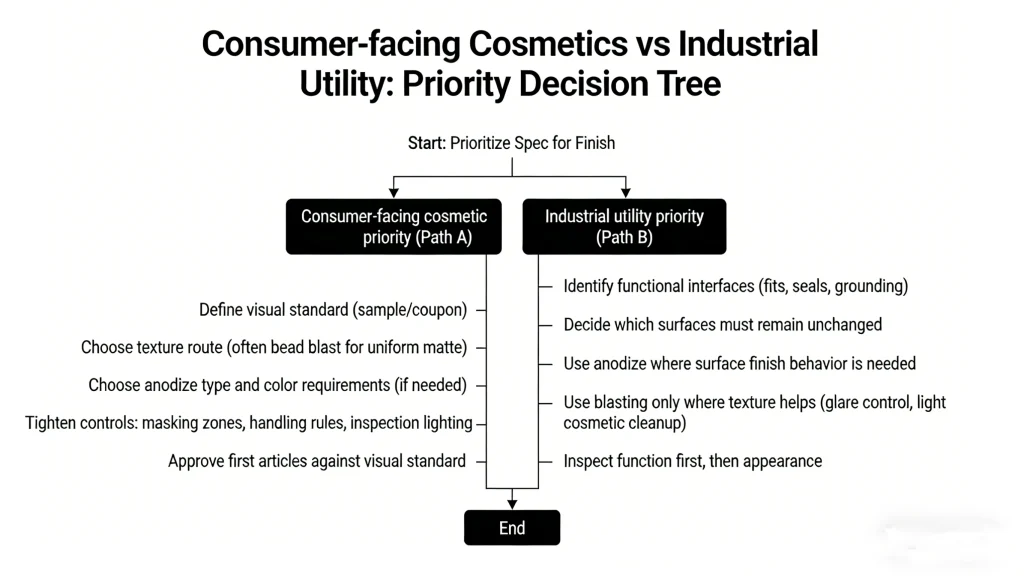
In practice, many projects sit between these paths. The decision tree still helps because it forces you to state what “good” means.
Material and alloy considerations: what to confirm with your finisher before committing (intake form template)
Alloy variation is a common root cause of anodize appearance mismatch. It can also affect how blasting media interacts with the surface.
Use an intake form to reduce guessing:
Part and material
- Número de pieza y revisión
- Material specification as purchased (include alloy and temper if known)
- Are multiple material lots allowed in one build? (yes/no)
Geometry and critical areas
- List of critical bores, threads, sealing faces, and bearing interfaces
- List of cosmetic faces (A-surfaces) and acceptable contact mark zones
- Any thin walls, deep pockets, or internal channels that are hard to blast/clean
Requisitos de acabado
- Bead blasting: media type preference (if any), target appearance (visual standard), and areas to exclude
- Anodizing: type/class callout, color requirements if dyed, and areas to exclude or mask
- Inspection method: visual standard + any functional gaging after finish
This keeps the conversation technical. It also reduces the risk that the supplier chooses a default media or default anodize route that does not match your intent.
Spec-writing essentials: how to communicate bead blasting/anodizing requirements (sample spec outline + table)
A good finish spec is specific about scope, acceptance, and verification. It avoids vague words like “nice finish” or “even anodize.”
Sample spec outline
- Scope: which surfaces are included and excluded
- Preparation: allowed pre-finish states (as-machined, bead blasted, polished)
- Process: bead blast requirements and/or anodize requirements
- Masking: explicit mask zones for threads, fits, and electrical contact points
- Cosmetic acceptance: visual standard and allowed variations (racking marks zones, shade variation limits as defined by sample)
- Functional acceptance: post-finish checks for fits/threads as needed
- Cleaning and handling: cleanliness expectations if needed for assembly
A compact way to put this on a drawing package is a table:
| Artículo | Bead blasting requirement | Anodizing requirement |
|---|---|---|
| Surfaces included | Define faces or “all over except…” | Define faces or “all over except…” |
| Surfaces excluded | Threads, bores, sealing faces, datum interfaces (list) | Same, plus electrical contacts if needed |
| Target appearance | Matte/satin-like per approved visual standard | Color/natural per approved visual standard (if cosmetic) |
| Media / prep constraints | Media type allowed; avoid aggressive abrasive where features are fragile | Pre-finish condition required (as-machined vs blasted) |
| Acceptance checks | Visual + feature integrity (edge condition, text legibility) | Visual + functional checks (threads, fits) |
| Notas | Clean out media from holes/pockets before next step | Racking contact zones allowed only in defined areas |
This is the practical answer to “Can you anodize without bead blasting?” Yes. Many parts are anodized as-machined or after other prep. The real question is whether anodizing alone will meet the appearance requirement you have in mind. If the goal is a uniform matte texture, you often need a defined texture step (bead blast or another method) before anodizing.
Finalizar
Bead blasting vs anodizing is a choice between changing surface texture and changing surface chemistry, and many feasible designs use both. If you need a matte, uniform look that hides tool marks, start by evaluating bead blasting and its risks to edges and fine features. If you need an oxide finish for aluminum parts, start by evaluating anodize type, masking needs, and how the oxide layer may affect fits and threads.
The approach is suitable when you can define cosmetic zones, protect critical interfaces, and agree on how the finish will be inspected. It becomes risky when the drawing relies on vague appearance language, when tight tolerances sit on surfaces that will be blasted or anodized, or when alloy and prep steps are not controlled across batches.
Preguntas frecuentes
Should I bead blast before anodizing?
You should often bead blast before anodizing if you want a matte, uniform finish and better consistency than as-machined surfaces provide, as bead blasting uses gentle media that enhances the appearance and prepares the surface for processes like anodizing. The bead blasting process uses bead media to remove tool marks and prepare the surface for anodizing, and you only need to check for edge rounding risk, thorough cleaning of embedded media, and proper masking for fits and threads—key best practices to follow for optimal results. If tight interfaces exist, limit blasting and anodizing to cosmetic faces only to protect functional areas, as bead blasting is generally safe but requires care around critical features, even across various industries.
Does bead blasting change part dimensions?
Bead blasting is gentler than heavy abrasive or etching processes, which is why it creates a smooth finish without damaging the surface of aluminum CNC parts. It generally does not drastically change part dimensions, though it can alter geometry in localized ways, mainly by rounding edges and softening small features, and bead blasting may affect the effective size of threads and small holes if bead media hits those areas. If dimensional accuracy is critical, define no-blast zones and inspect those critical features after the bead blasting process, as this process is adaptable to types of materials.
What is the best finish for aluminum CNC parts?
There is no single best finish for aluminum CNC parts, since the ideal choice balances aesthetics and performance based on the specific requirements of your project and spans a range of finishing options. Bead blasting is one of the most versatile options for achieving a uniform matte texture and removing tool marks, while anodizing provides a durable oxide finish and optional color; many finishing services offer combined solutions including bead blasting and anodizing to get the ideal look and performance. The right finish should be tailored to the material and intended use of the part.
Can you anodize without bead blasting?
Yes, you can anodize without bead blasting, as anodizing can be done directly on as-machined surfaces or after other prep steps, though bead blasting enhances the final anodized result by creating a consistent base. The main limitation is that anodizing alone will not remove tool marks or create a uniform finish, so bead blasting creates a more consistent, professional base when cosmetic appearance is a priority for your aluminum components—especially as it works well with processes including anodizing. This guide explains how to choose the best surface prep method for your specific needs.
Referencias
https://www.osha.gov/silica-crystalline
https://nvlpubs.nist.gov/nistpubs/Legacy/HB/nbshandbook116.pdf
https://quicksearch.dla.mil/qsDocDetails.aspx?ident_number=36007